Learn more about the Ingenico terminal - NAB
About the Ingenico Move/5000 EFTPOS terminal

Quick view
- Colour: Black
- Display: 8.89cm colour touchscreen
- Dimensions: Length 169mm x Width 78mm x Height 57mm
- Lightweight: 320 grams
- Contactless payments
- Mobile and countertop in one
- Fast thermal printer
- Security PCI PTS 4, 5, & 6
Connectivity
- Mobile 4G
- Bluetooth between terminal and base
- Wi-Fi
Having trouble with your Ingenico terminal?
Explore our Ingenico terminal troubleshooting guide and fix common terminal issues.
Guides for using your terminal
Getting started
-
- Enter the sale amount directly on the screen and press CONTINUE (green button).
- Ask the cardholder to TAP, INSERT or SWIPE their card on the machine.
- For INSERT and SWIPE, cardholders are promoted to select their account (Cheque, Savings or Credit).
- Cardholders will be prompted to enter their PIN and press Enter.
Note: If the cardholder taps, they won’t need to enter their PIN or sign for amounts less than $100. If the amount is between $100 and $200, the cardholder may need to enter their PIN, depending on the card issuer. For amounts over $200 the cardholder will need to enter their PIN. - Once the payment has been processed, the screen will display either “Approved” or “Declined”. Remove the card if it was inserted.
- The terminal will print the merchant receipt with a prompt to print a customer copy.
Note: this function is available on your integrated terminal, however some steps may not apply or may be initiated via the POS.
-
- Press 1 in the Menu to select Transaction.
- Press 4 to select Refund.
- Enter the refund amount.
- Enter your refund password.
- Ask cardholder to TAP their card and select an account (Cheque, Savings).
- Ask cardholder to enter their PIN.
- Once processed, the screen will display “Approved” or ‘Declined’.
- The terminal will print the merchant receipt with a prompt to print a customer copy.
Note: this function is available on your integrated terminal, however some steps may not apply or may be initiated via the POS.
-
- Press 3 in the Menu to select Batch.
- Press 1 to select Settle – the settlement process commences and once successfully processed, the settlement receipt will print.
- QA NAB processing message is displayed.
- Press Yes to print a transaction list of all individual transactions.
- Printing message is displayed.
Note: this function is not available when your terminal is integrated with your POS.
-
This function allows you to set-up the terminal to automatically settle every day at a preferred time that you specify.
The terminal must be switched on for automatic settlement to occur. For overnight settlements, it is recommended the terminal remains on its charging base.
Note: This function is not available on your NAB EFTPOS Mobile terminal when your terminal is integrated with your POS.
Setting up automatic settlement
- Press the Func key.
- Enter 13 using the PINpad and press ENTER.
- Press ENTER to change the time.
- Enter the new time in the 24 hour HH:MM format, and press ENTER.
-
- Press the Menu button then press 4 to select ‘Terminal’ in the Menu.
- Press 5 to select Surcharging.
- Select the ‘Enable’ button then press ENTER key to continue.
- Surcharging is enabled. Press CANCEL.
- Use the arrows to select the issuer and press ENTER.
- Press 1 to enter a Fixed Fee or 2 to enter a Percentage of the Total.
- Enter Fixed fee surcharge amount for each transaction amount, as this surcharge method was chosen in previous step.
- Press ENTER to confirm the value entered.
- The value entered will display in the Select Issuer screen. Repeat steps 5 to 8 for each card or account type, to apply a surcharge value. Press CANCEL to exit menu.
- Press OK to print Surcharge configurations setup or CANCEL to exit, Surcharge Configurations.
Note: Surcharge amount will be shown on every transaction receipt.
For further information on surcharging, please refer to Surcharging on EFTPOS, debit and credit card payments.
Everyday tasks
- Press 2 in the Menu to select Print.
- Press 1 to select Transactions.
- Press 3 to select Transaction List.
- Scanning batch details message is displayed.
Note: this function is not available when your terminal is integrated with your POS.
Maintenance
-
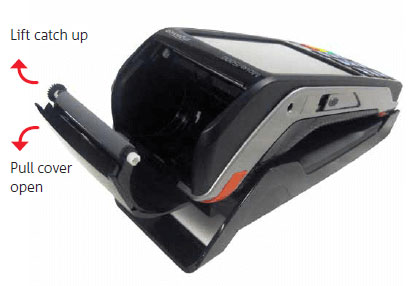
To change receipt rolls, follow the below instructions:
1. Open the paper compartment by lifting the catch located at the top of contactless landing zone, and pull the cover to the rear of the terminal.
2. Insert the paper roll into the compartment at the rear of the terminal.
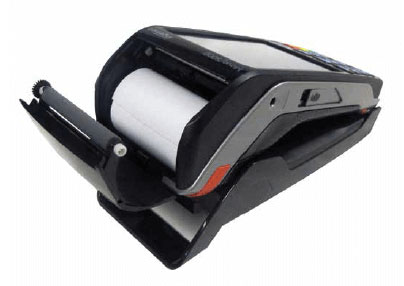
3. Pull the paper up towards the top of the terminal.
4. Maintain the paper and close the cover.
5. Press simultaneously on both upper corners of the contactless landing zone until it clips into position.
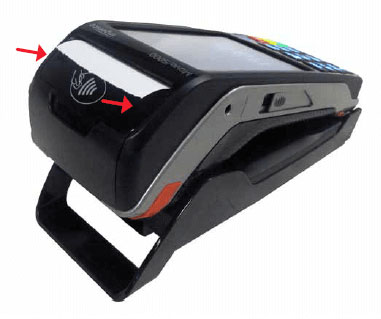
6. If needed, press the Feed key on the keypad to advance the paper.
-
- Press the Func key.
- Enter 32 using the pinpad and press ENTER.
- Select 2. REFUND and press ENTER.
Note: To change the password for Key Entry, select Key Entry instead. - Enter the current password and press ENTER.
- Enter the new password and press ENTER.
- Enter the new password again and press ENTER.
- A confirmation message is displayed when successful. Press CANCEL to exit the menu.
-
To order receipt rolls
You may order receipt rolls directly from your terminal. The stationery order will be sent after a logon or the next financial transaction. You will receive an order of 20 rolls within 2-5 business days.
- Press the Func key.
- Enter 30 using the PINPAD and press ENTER.
- Press ENTER to order reciept rolls.
- A message displays to confirm the order is been submitted.
-
The Tip Amount screen will only display if the tipping feature has been enabled. You may enable or disable the tipping feature by contacting the Merchant Service Centre. A sale with tip transaction is shown as one total item in the settlement report and on the monthly merchant statement.
Note: This function is not available on your NAB EFTPOS Mobile terminal when your terminal is integrated with your POS.
Setting up tipping on EFTPOS terminal Ingenico
- Enter the sale amount on the screen and press CONTINUE.
- Enter the tip amount and press CONTINUE.
- Review the total amount and press ENTER.
- Ask the card holder to TAP, INSERT, or SWIPE.
- On PIN entry screen, ask the customer to enter PIN and press ENTER.
- Once processed, terminal will display response (Approved/Declined) on screen.
- Terminal will print Merchant receipt with a prompt to print customer copy.
Learn more in NAB help
More help and support
Here are some other helpful guides to run your business.
Talking shop
Business security hub
Keep your business and customer information safe with security tips to help prevent fraud.
Protecting your business online
Find out how you can reduce your risk with 3-D Secure.
Same day settlement
Make it easy for your customers to pay their bills with our range of billing solutions.
Contact us
Talk to a Transactional Banking Specialist
Let us help with your business banking needs, Monday to Friday, 8:00am to 6:00pm (AEST/AEDT)
24/7 Terminal support
Call us for terminal support 24/7.
Important information
Apologies but the Important Information section you are trying to view is not displaying properly at the moment. Please refresh the page or try again later.